
RETECHNOLOGY PREMIUM MARKETPLACE RELATED PRODUCTS | WEBINARS | SPECIAL OFFERS


You are viewing our site as an Agent, Switch Your View:
Agent | Broker Reset Filters to Default Back to ListHow to Automate a Google Sheets Lead Capture Form
May 28 2019
 One of the questions we often receive is how to automate lead capture using RPR reports. Essentially, how can an agent create a process that uses an RPR report to generate leads? Although RPR doesn't have a system to do this out of the box, with a little creativity, it's possible with Google Forms, your own Gmail and Zapier (yes, the free plan).
This article will walk users through the step-by-step of creating a report, building a form with Google, and automating the follow-up with Zapier and Gmail. There will be a manual step of copying the report URL to Zapier, but the report can be used for multiple submissions. Let us explain…
Imagine offering your website visitors a branded Market Activity Report that showcases recent neighborhood activity like new homes, price changes, and open houses. Or perhaps offering visitors a detailed School Report for a local school. Or maybe even a Neighborhood Report highlighting the local area. It's all possible with just a small amount of effort on your end.
For this example, let's use the offer of a Market Activity Report that showcases neighborhood activity like new homes, price changes, and open houses. This strategy works well, given that one report can work for multiple people. The key is to create a new report each week, so the information is fresh.
This tutorial is divided into three parts:
- Creating the Market Activity Report in RPR
- Creating a Form with Google Forms
- Connecting your Form to Zapier
Creating the Market Activity Report in RPR
- Visit narrpr.com.
- Select Market Activity and enter your area. Consider generating the report for a zip code or neighborhood.
- Use the dropdown to adjust your timeframe.
- Select the search button.
- Choose Create a Report.
- From the reports page, choose Market Activity Report.
- Select More Details and choose what to include or omit from the report.
- Start with selecting the report elements.
- Confirm how far back the report should showcase activity changes.
- Select which property status to include.
- And what Property Types to include.
- Select how many properties the report should have per status.
Creating a Form with Google Forms
The first step will be to create a new form and then add questions.
Create Form
- Visit forms.google.com, and click Blank.
- Next, give the form a name. Click Untitled form and type a new name.
- Directly under title, add the form description.
- Select the color palette icon in the upper right side of the screen and set your options, including the header image, theme color, background color, and font style..
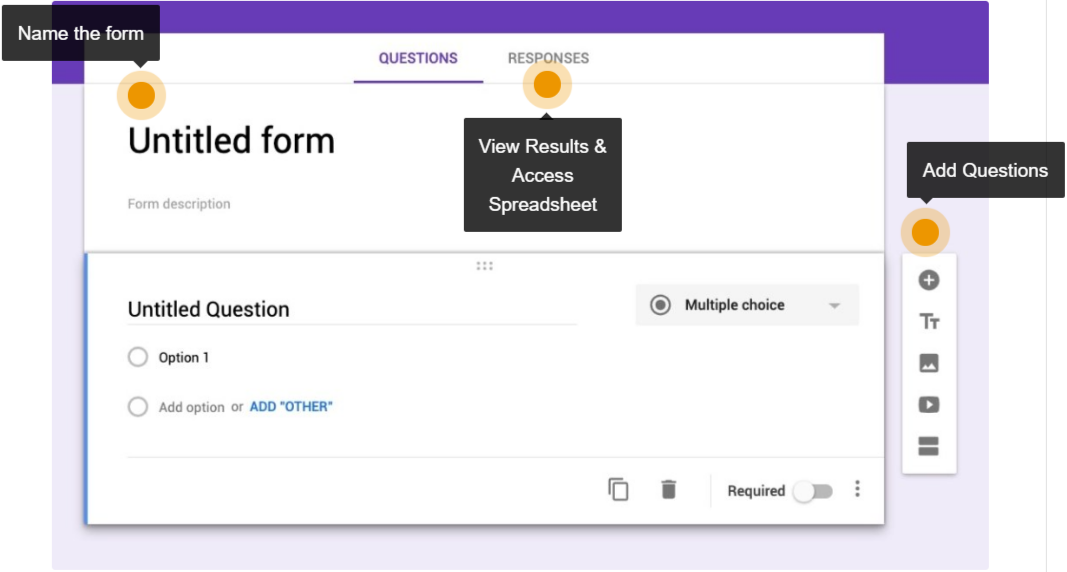
Add Questions
- The first question is already added, select Untitled Question and type the question.
- Change the question type by selecting the dropdown to the right.
- Add response options (if applicable).
- Toggle the Required switch to make a question mandatory.
- To add more answers, choose Add Another.
- To add a new question, click the + on the right.
Confirmation Message
- Click Settings > Presentation.
- Under Confirmation message, enter your text and click Save.
Send Results to a Spreadsheet
- With your form open, at the top center, select Responses.
- Now click on the three vertical dots.
- Click Select response destination.
- Select Create a new spreadsheet.
- If you want to change the spreadsheet name, this is a great time. Highlight the current name and type over it. Remember this name; we will access the file in a later step.
- Click Create.
Connect your Spreadsheet to Zapier
Zapier will be set up to watch your spreadsheet. As a new row is added, we'll program Zapier to send a follow-up email to the latest person requesting a report. Note: When creating a Google Sheets Zap, you will be asked to connect a new account.
Setting up the Trigger
- Select the Make a Zap button.
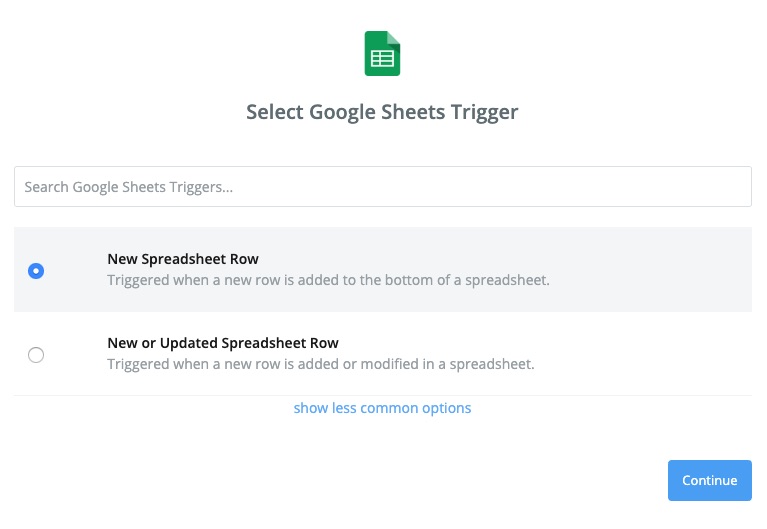
- Using the search bar at the top, type Sheets.
- Select Google Sheets.
- Select New Spreadsheet Row.
- Advance to the next screen by selecting Save + Continue.
- Now select Connect an Account.
- A window from Google will appear. Log in with your Google username and password to authenticate/authorize the connection between that Google Sheets account and Zapier.
- Note: If you are already logged in to your Google account on your browser, you will be asked to approve access to Zapier.
- Accept access to Zapier on Google Sheets.
- After approving access, Google Sheets will now be connected.
- Choose Save + Continue.
- Now use the Spreadsheets dropdown to find the spreadsheet from step 4 of Send Results to a Spreadsheet above.
- From the Worksheet dropdown, select the worksheet. (The tab name in spreadsheet.)
Setting up the Action
- Now search for Gmail.
- Choose Send Email (See graphic below)
- Advance by selecting Save + Continue.
- Because you already authorized Google with Zapier, your Gmail account should be linked. If so, continue on to Step 7. If not, go to the next step.
- Select Connect an Account.
- A window from Google will appear. Login with the Google username and password needed to authorize your Google email connection.
- Accept access to Zapier on Gmail.
- Select Save + Continue.
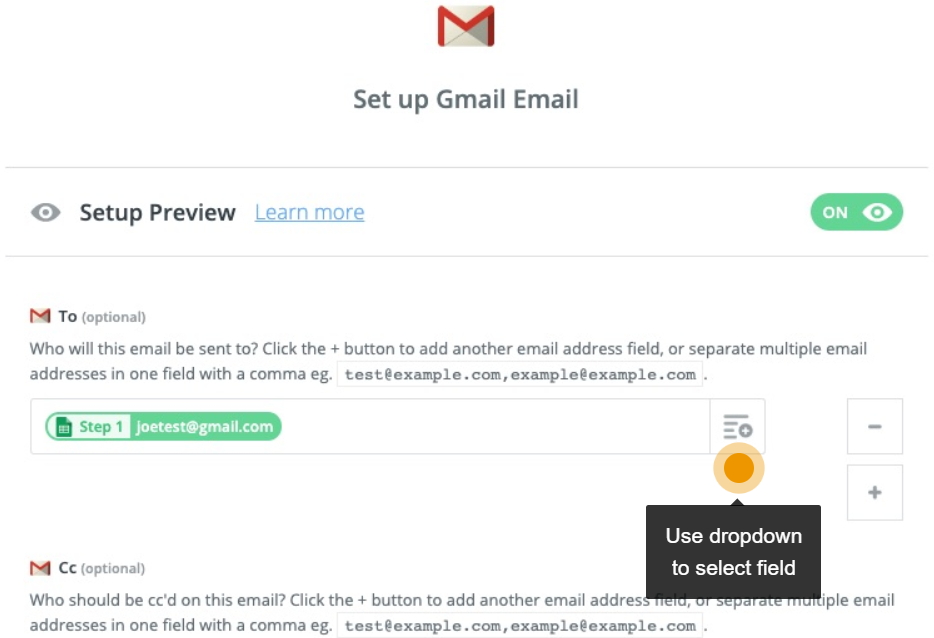
Setting up the Gmail Email
The text below will describe each field on the Setting up Gmail Email screen.
- To: Here you will use the dropdown to select the column that is holding the email address from your form.
- CC: If you want to have an email address copied on the email, enter it here.
- BCC: If you want to have an email address blind copied on the email, enter it here.
- From: Enter your Gmail email address.
- From Name: Enter your name.
- Reply To: Enter your Gmail address.
- Subject: Enter your subject line.
- Body Type: Choose the type of email – Plain, HTML.
- Body: Write the template email here. Use the button on the right to add merge fields from your spreadsheet as needed.
- Label/Mailbox: Allows you to choose a label or Mailbox for the email.
- Attachments: Enter the URL for your RPR Report here.
- Choose Continue.
- Now select Test this step to test email.
TIP: Update your report weekly to make sure you have fresh data. Then update the URL in step 11 above with the new report.
Demo – Try for Yourself
If you would like to see this demo in action, click this link and complete the form. You should receive an email within a few minutes. Good luck!
To view the original article, visit the RPR blog.