
RETECHNOLOGY PREMIUM MARKETPLACE RELATED PRODUCTS | WEBINARS | SPECIAL OFFERS


You are viewing our site as an Agent, Switch Your View:
Agent | Broker Reset Filters to Default Back to ListHow to Shoot Listing Photos at Dusk
November 23 2010
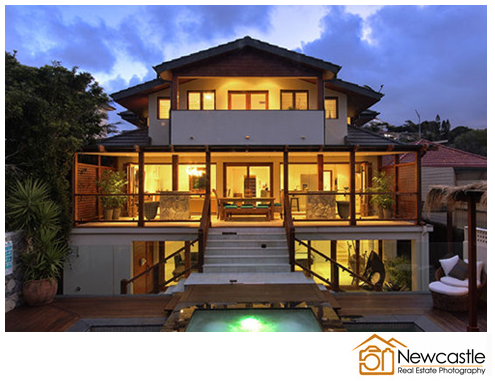 When I’m scrolling through a library of listing photos, I find myself most attracted to those shot at dusk or dawn. There’s something about the warm glow of a house contrasted against the cool sky that is not only punchy and attention-grabbing, but wholesome and safe. I’m no anthropologist, but I’d be willing to bet it has something to do with our instinctual attraction to a warm fire glowing from within a comfy cave.
Even though these types of photos are arguably more attention-grabbing than daytime ones, there are good reasons why most real estate exteriors are not shot this way. For one, dusk shots are harder to execute – they require higher level camera knowledge. Secondly, they involve more elaborate setups often involving powerful fill lights, not to mention the task of turning on every light in the house prior to the shoot.
Lastly, these shots require accurate planning, as the window of opportunity is extremely short (dusk generally lasts about 30 minutes).

When to Shoot
The trick is to shoot your photos at the time when the sun is just rising or setting which, of course, varies depending on the time of year. For dusk shots, aim for the time when the sky is a deep blue but has not yet faded to black. If you arrive to the house at dusk, you’re already too late. Always allow yourself at least a half-hour to prepare for the shoot – that is, turning on the necessary lights and setting up your camera equipment. If you have extra time, you can always shoot a few interior shots.
Equipment Needs
1) Camera & Lens: A DSLR camera with a wide or mid-range zoom lens. At the very least, a camera where you can control the shutter speed.
2) External Flash(es) (Preferably Wireless): You can shoot exteriors at dusk using ambient light in some instances, but I would recommend having at least one extra flash to act as a fill light on the front of the house to balance the exposure – two flashes are even better. The built-in flash on your camera is NOT powerful enough.
3) Tripod and Light Stand: A sturdy tripod that is capable of being set up on uneven terrain, and a flexible light stand or two so you can properly place your flash(es).
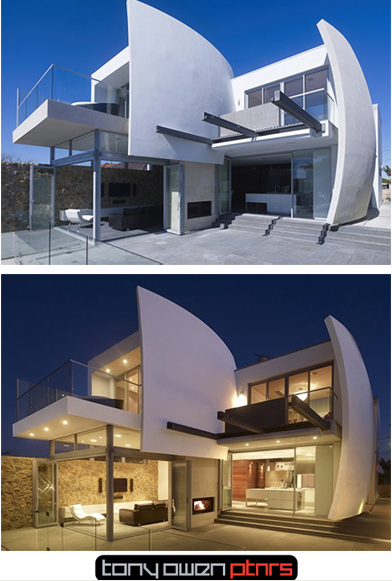
Comparison
Before we move on, lets have a quick look at two images of the same building taken by Tony Owen Partners. It’s interesting to compare these images, and it shows just how different the look and feel changes when a listing is shot at a different time of day. Both photographs are superb, and the design of the building is extraordinary, but if you’re like me, you’ll be drawn more to the dusk shot:
Process
Camera/Scene Setup: Start by turning on all the house lights (inside and outside) and make your way around the property seeking out the most interesting angles. Next, set up your camera and take a couple test shots to ensure your framing and focus are spot on. Aim for a slow shutter speed (from 1/3 second to 2 or 3 full seconds) – keep in mind that you will need to make constant changes to your shutter speed to accommodate the fast change in available light. Keep your ISO low (200-400), and open up your aperture, but not necessarily fully open (f4 or f5 should do – just try to find a point where you get a pleasurable depth of field). Keep the camera on a tripod at all times.
Lighting Setup: Set up your flash (if required) at a distance and crank it up to 1/2 or full power. You will need to know how far your flash can fire – the Nikon SB-900, for instance, maxes out at about 20 meters (66 ft). Try to get the light to wash over the front face of the house. If you are shooting at an angle, you may need a flash angled at both the front and side of the house. Take a couple test shots to ensure proper placement. A second flash can also be used to lighten foreground objects. If you are getting enough ambient light, you may not need a flash at all.
To trigger your flashes wirelessly use whatever method you prefer. Check out this old post for more information: How to: The Off-Camera Flash.
Shooting Method:
If you have a remote for your camera, use it. If not, use the self-timer so that you don’t have to touch your camera while the photo is being taken. Even little bumps of the camera can lead to camera shake during long exposures. Keep an eye on your exposure and try to maintain a balance between interior and exterior light. Cool blues and warm yellows are a good sign.
Ideal Listing Styles
Houses with swimming pools, reflective patios or sheer entranceways are extra good, as you can play with reflections, further enhancing the property. Properties that have numerous large windows help to invite the viewer inside, and further enhance that glowing attractiveness. Luxury properties, or those with interesting design styles shoot very well. Houses during the Christmas holiday season can be fun if they’re decorated.
The real trick is to practice, and take time to perfect your skills. Happy shooting, and as usual, feel free to add in any additional tips in the comment area below!